
https://arstechnica.com/?p=1542613

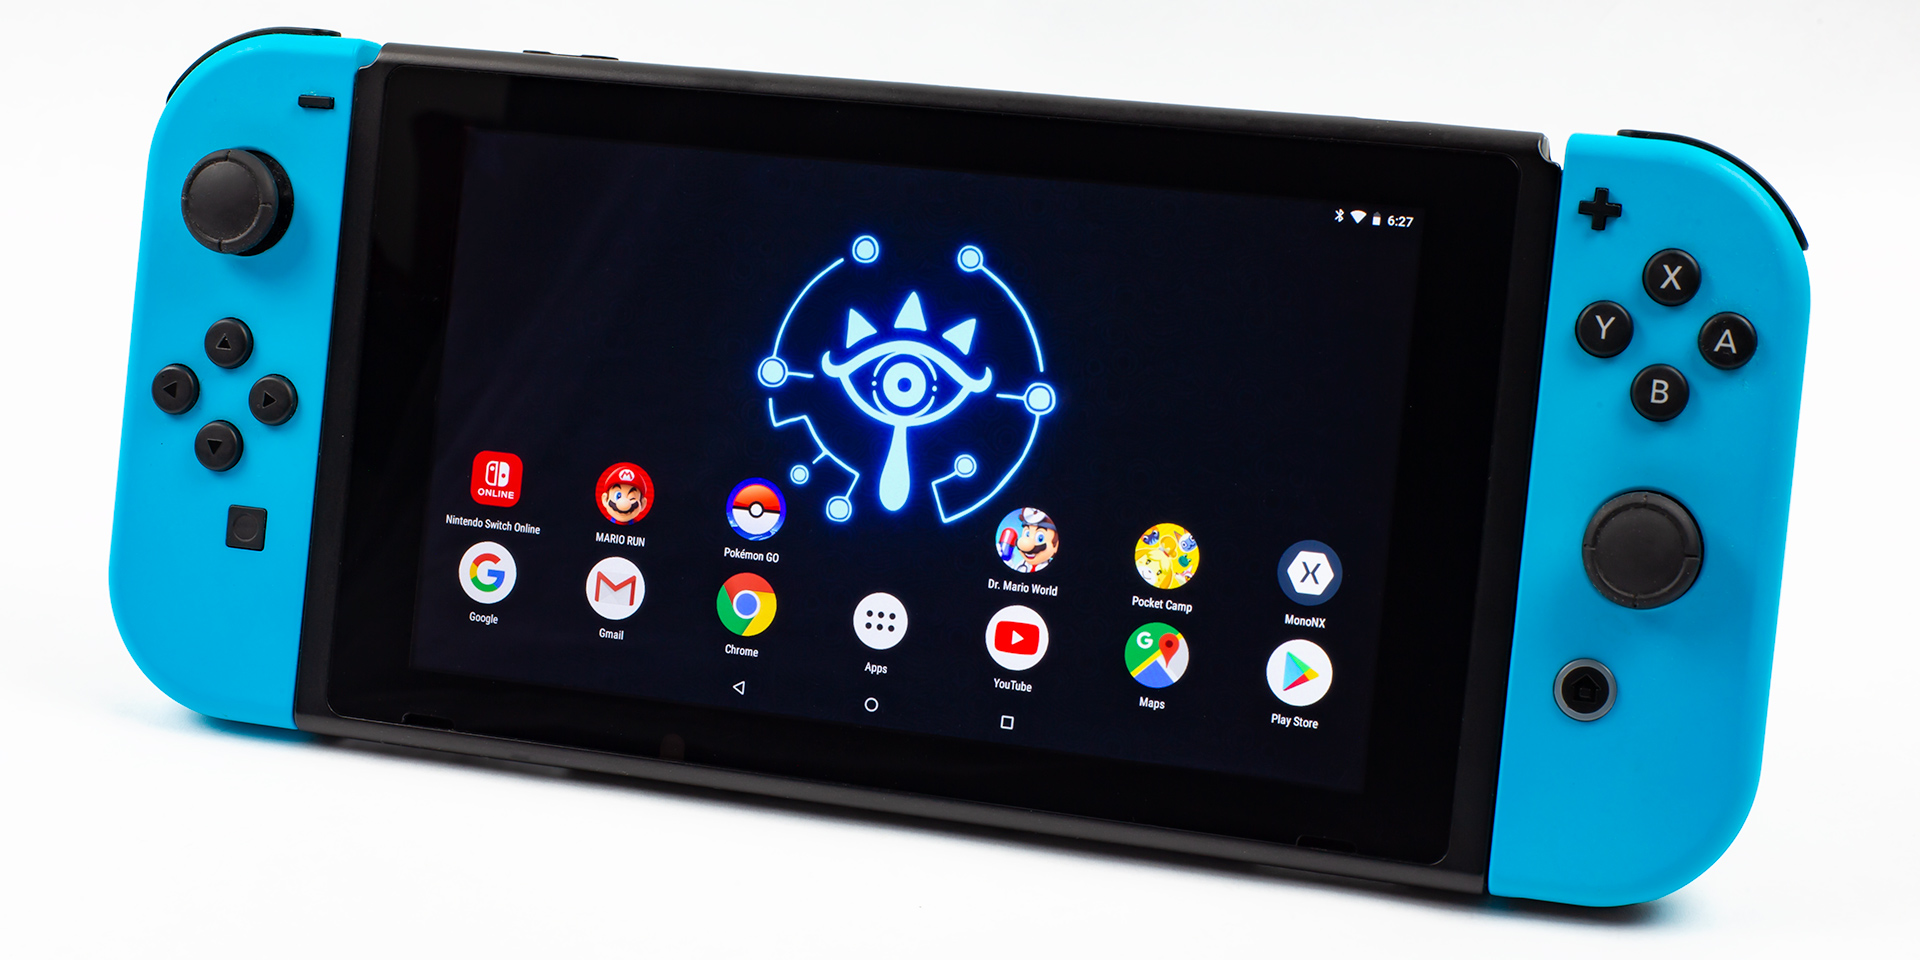
Android on the Nintendo Switch. Just think of all the Nintendo apps you’re missing out on.
The Nintendo Switch is, basically, a game console made out of smartphone parts. The quad-core Nvidia Tegra X1 ARM SoC would be right at home in a smartphone or tablet, along with the 4GB of RAM, a 720p touchscreen, and a 4310mAh battery. Really, the only things that make the Switch a game console are the sweet slide-on controllers and the fact that it is blessed by Nintendo, with actually good AAA games, ecosystem support, and developer outreach.
With such a close relation to smartphone hardware, it only makes sense that people would eventually load some smartphone software onto the Nintendo Switch—and around Ars, we’ve recently made everyone’s favorite handheld run Android. Such a thing might sound like a hardware hacker’s pipe dream, but thanks to work from a group called “Switchroot,” you can now get a pretty good build of Android up and running on Nintendo’s console.
A project like this is only possible thanks to two of the Internet’s biggest hacking communities joining forces—you’ve got the best of the Nintendo Homebrew scene combining with the best of the Android custom ROM community. And as we recently discovered, getting Android running on the Switch is a whirlwind tour of huge community projects and discoveries all in the name of doing whatever you want with hardware you own.
Currently, we don’t have a strong argument for why anyone would want to run Android on the Switch, other than it’s super fun, and walking through the process is a great way to learn more about the Switch and Android. And if you’ve been disappointed with Nintendo’s lack of an official Virtual Console on the Switch, you’ll be able to blow open the doors to classic gaming, both with Android ports of titles for sale on the Play Store and access to about a million emulators.
But before we worry about loading Android onto the Switch, the first step is a getaway: we have to break out of Nintendo’s sandbox.
The Homebrew basics
While you might think running Android on a thing made out of smartphone parts was inevitable, the road to getting Android on the Switch first had to be paved by the Switch homebrew community. Out of the box, game consoles are locked down to only run software the manufacturer wants them to run. So before anyone can even think about running something like Android, a group of dedicated hackers first had to document how the Switch worked, hunt down exploits, develop software, and probably destroy some devices in order to figure out how to actually run arbitrary code on the Switch.
In this case, Nintendo’s use of an off-the-shelf Nvidia Tegra SoC gave the hackers a good starting point. As a commercial product, the Tegra SoC has a ton of documentation and even readily available developer kits.
started on one of these development kits, and documentation from Nvidia even detailed how to bypass memory management and kick off the first exploit. As one of the hackers behind the exploit said, “Nvidia backdoored themselves.”
Since then a number of vulnerabilities have been discovered in the Switch’s hardware and software, but the biggest is “Fusée Gelée,” an exploit in the recovery mode of the Switch’s Tegra X1 SoC. Of all the fun and interesting ways you could break the security of a video game console, a recovery mode vulnerability is pretty handy.
Like many ARM-based computers, the Nintendo Switch has a built-in recovery mode that it can be booted into instead of the OS. This mode is meant for the initial flashing of the consumer OS, and it’s used for recovery in the event of a damaged operating system. The consumer OS is meant to be frequently updated and changed over the life of the console, but if anything goes wrong and the main OS stops working, this recovery mode is your only way to possibly recover the system. Since it is very important that this recovery mode never gets damaged or maliciously modified, it is completely independent of the main OS, and it’s read only—it can never be changed or updated once the device leaves the factory.
An exploit in the recovery mode is seriously bad news for a company like Nintendo that wants to lock down its hardware. For devices that have already left the factory, recovery mode can’t be patched with a system update. The whole point of the recovery mode is that it always works and never changes, so that it can never be broken by a dumb user, a malicious program, or a bad update. So shortly after the disclosure of Fusée Gelée, Nintendo reportedly started producing new Switches that were immune to the vulnerability, but there are still 15 million-ish devices out there with a unpatchable recovery mode. Any Switch purchased before mid-2018 should be vulnerable, and you can compare your serial number against this list if curious. You can also just give the exploit a shot and see if it works. A detailed step-by-step guide on how to do this is here—we’re just giving a brief overview.
The process of triggering Fusée Gelée and loading homebrew on your Switch is, frankly, pretty cool. First you have to boot into the Tegra’s ReCovery Mode (called “Tegra RCM”), which, just like on a smartphone, is done with a secret key combination. On the Switch, recovery mode requires you to turn off the system and hold the buttons for “Volume Up,” “Home,” and “Power” on the body of the Switch, not the Joy Cons. This is kind of a problem, because if you detach the Joy Cons and just hold the Switch body in your hands, you’ll find a volume rocker and power button on the top edge, but you won’t find a home button anywhere.
-
Connect this gold Joy Con pin to ground and you’ve got access to the super-secret home button.
Ron Amadeo
-
Option 1: Jam a carefully crafted paperclip into the Joy Con port. It’ll be fine! (Really though, don’t break anything.)
-
Option 2: Javelin a safety pin into the Switch Joy Con port, striking Pin 10 and the bottom of the Joy Con rail.
-
Option 3: Cut the right parts off of a Micro USB plug, 3D print a case for it, and then slide the whole assembly into the Joy Con rail.
-
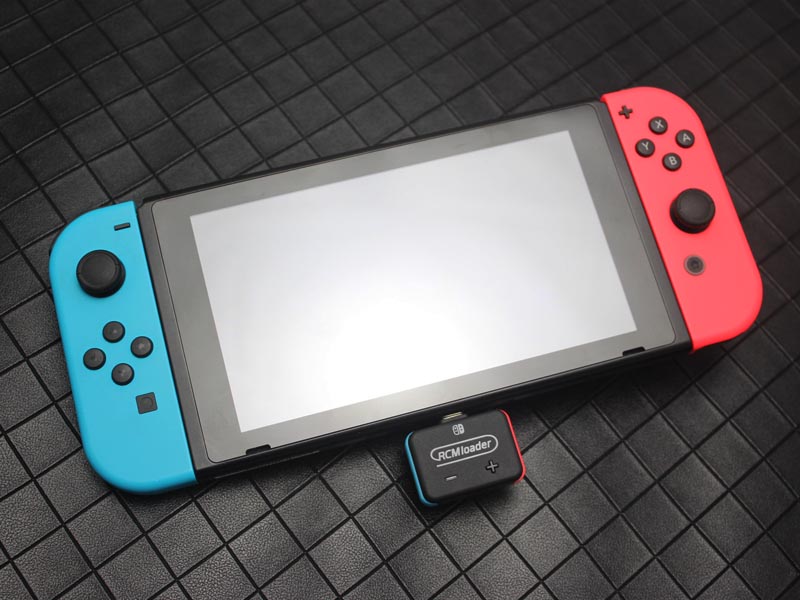
Option 4: Take the coward’s way out and buy a professionally made RCM jig on Amazon for a few bucks.
-
For maximum modder points, open a Joy Con, solder wires to the Joy Con side of Pin 10 and Pin 1, cut a hole in the side of your controller, and connect the wires to an exposed on/off switch. Sweet.
In the name of Android, we’re still going to trigger the home button, though, even if a home button doesn’t physically exist. The system-defining Joy Con rails on the sides of the console have an electrical connector tucked into the bottom of the rail. This set of ten gold connectors is normally used for charging the controllers and passing data back and forth, but during the initial simplified boot-up state, the Tegra SoC has the rear-most pin on the right joycon rail (usually referred to as “Pin 10”) mapped to the system’s “Home” button. Just bridge Pin 10 to ground (via any of the rail screws or the ground Joy Con pin), and you’ve got yourself a system home button.
These pins are pretty small, about the size of a MicroUSB pin, and they are tucked away in the bottom of the rail, so they can be tough to get at. The homebrew community has been coming up with all sorts of fun and creative ways to make what is referred to as an “RCM Jig”—a tool that connects Pin 10 to ground. I’ve seen everything from artisanally crafted paper clips to safety pins to sacrificial Joy Con connectors. The nicest and most repeatable way, though, is to buy or 3D-print a plastic cap that smoothly slides into the Joy Con rails and bridges Pin 10 to Pin 1.
Going the DIY route for an RCM jig can be dangerous, since shorting the wrong pins or damaging the pins can damage your Switch. Buying a pre-made jig has much less room for error and less risk of damage, and shorting the pins correctly is really the only hard part of modding the Switch—from here on out it’s all software work. Compared to some of the old-school console mods where you would have to open the system and solder a modchip to the CD drive, being able to break into the Switch without even picking up a screw driver is pretty easy.
Now that we have a way to press our non-existent system home button, turn the Switch off all the way, and it’s time for the magic key combination. Slide in your RCM jig, hold “volume up” and “power” at the top of the Switch, and, if you did it right, uh, nothing will happen. The Tegra’s recovery mode on the Switch does not have any fancy graphics or even a text message confirming the mode is on—the Switch just looks like it is off. So a completely blank screen after pressing the power button is a good thing—that or the random bits of metal you jammed into your Switch killed it and you’ll have to go back to playing the Wii U. (As always, with great power comes great responsibility—proceed with projects like this at your own risk.)
If successful, now we have theoretically entered recovery mode, so we should probably talk about the exploit we’re going to do. Fusée Gelée is a USB-based exploit, so we’re going to plug the Switch into something and send it some magic exploit-packing software. The way these recovery modes are supposed to work is that they should only accept a signed software package from the system manufacturer, thereby allowing you to do something like re-flash the system software—but only approved system software from the vendor.
Nvidia’s recovery mode contains a copy operation that did not quite get coded correctly, though, and by sending it a bad “length” argument you can trigger a buffer overflow and gain control of the Tegra’s “Boot and Power Management processor (BPMP).” “BPMP” is a Tegra-specific design flourish, and it’s a tiny ARM7 “boot cpu” designed to get the system up and running. Because BPMP is the very first step in the Tegra boot-up process, taking control of this means you’ve owned the system before any security lockout procedures start. From here, it’s possible to exfiltrate secrets and make the main CPU do whatever you want, which gets executed at the highest possible privilege level. Again this is all from recovery mode and completely unpatchable via the consumer update system, so it’s pretty bad news for Nintendo’s security.
You probably don’t need a USB dongle to load software onto the Switch, but this one is so pretty!
You’ll need some kind of USB-host to beam over the magic software package to the Switch, and just about anything will work. There is Switch RCM software for Windows, Mac, Linux, and even Android, which is thematically appropriate for our purposes (yes, you could totally hack a Switch from another Switch!). There are even purpose-built USB dongles with their own internal storage and a battery—just plug it in, pick your payload, and it will zip over the right (preloaded!) software.
Now that we can do whatever we want, a popular next step is to have the RCM loader send over the “Hekate” bootloader, which will provide a nice boot menu to launch other custom software from the Switch’s MicroSD slot. And from here, the sky’s the limit. You can permanently mod the Switch with custom firmware that does things like turn the Switch OS’ “Album” screen into a homebrew menu. You can back up your Switch or make game backups.
Or, as of this month, you can launch Android!
Getting a working build of Android
While there were early rumors of the then “Nintendo NX” running Android out of the box, the Switch’s OS is actually a custom microkernel called “Horizon.” This can trace its lineage back to Nintendo’s previous portable console, the 3DS. Still, side-stepping Horizon and loading Android won’t be the first time Android code has hit the Nintendo Switch. Nintendo’s licensing info screen contains a shoutout to Android’s infamous ”Stagefright” media playback engine, indicating it is used in the Switch somewhere. According to the SwitchBrew.org wiki, Stagefright powers the Switch’s built-in game recording and the Album screen’s media playback capabilities.
The graphics pipeline also didn’t escape the reach of Google’s codebase. Developers of the “Yuzu” Nintendo Switch emulator flatly state on their blog, “Nintendo re-purposed the Android graphics stack and used it in the Switch for rendering. We had to implement this even to get homebrew applications to display graphics.” At least part of this is the ”Nvnflinger” service. Included in the SwitchBrew writeup for service is a great one-liner: “This uses Android code.” Judging by what Nvnflinger does and what it’s called, this service is not being shy about its relation to Android’s SurfaceFlinger, which composites display buffers and sends them to the display.
For Ars’ purposes, we’re going all-the-way Android, though, and with the ability to run whatever we want, we now need a build of Android that runs on the Switch. As a device running the Nvidia Tegra X1 SoC, the Nintendo Switch is a close cousin to two Android devices, the Nvidia Shield TV, a set-top box that runs Android TV, and the Google Pixel C, Google’s last (ever?) Android tablet. Tegra is pretty rare hardware for an Android device, since almost every other Android device on Earth runs a Qualcomm SoC.
The “Switchroot” team that got Android running on the Switch, Langer Hans and Bylaws, started with an Nvidia Shield TV branch of LineageOS, the most popular community version of Android. This is easier than starting with raw AOSP (Android Open Source Project) builds direct from Google, since, in addition to a host of power-user features, Lineage is made “device-ready” by an army of maintainers. Google’s AOSP codebase is more device-neutral, so while you want a lot of it, there’s also a lot that does not apply to an individual device. It’s also often missing proprietary code for an individual device.
If it wasn’t clear by now, the process from here is going to involve handing off bits from the Nintendo homebrew community to bits from the Android custom ROM community. We’re going to be running LineageOS 15.1 (based on Android 8.1 Oreo) and using TWRP (Team Win Recovery Project) to flash whatever we want to our new Android system partition, like the Google apps, which aren’t included with Lineage. TWRP is the biggest Android recovery project out there, and while it is completely separate from the Tegra’s built-in recovery mode, it’s kind of the same idea with more functionality. This is an alternate mini OS we can boot into that gives lots of administrative options for our build of Android. We get full offline access to the system in TWRP, so we can back up and restore images of the NAND flash, flash zip packages to the system partition, mount the system and edit things in a file manager, wipe the entire phone of user data, and change or upgrade the entire OS.
The one quirk with this “Switchroot” build of Android is that we aren’t going to touch the internal storage of the Nintendo Switch. Switchroot’s build is provided as an image file that you write to a MicroSD card, and this SD card will stand in as the primary storage for the Android system—instead of the Android partitions being on the Switch’s internal storage, everything runs from the SD card. This means none of this Android stuff can hurt your Switch or get it banned from Nintendo’s servers. Provided you only launch the Hekate bootloader and then launch Android (without touching ANY other buttons), you aren’t modifying the Switch’s internal storage at all. That way, Nintendo’s Horizon OS and servers are not aware you are doing anything unapproved with your hardware.
The instructions tell you to download an appropriately sized disk image and write the image to your SD card. Now, if you’re following along at home, don’t make the same mistake I did and grab any old SD card from the bottom of your junk drawer. In my initial “let’s just see if I can get this working” install, I mindlessly followed the instructions without realizing I was turning an SD card into my system’s primary storage device. When I booted up with my anonymous junk-drawer SD card, every…. button…. press… was accompanied by a laborious load time—even the keyboard was slow. So, don’t do this! Instead, use the absolute-fastest MicroSD card you can get your hands on. I ended up upgrading from a 16GB class 4 card to a 200GB class 10 card, and there was a night-and-day difference in performance.
-
The Hekate bootloader. For Android, we want to press “More Configs.”
Ron Amadeo
-
“More Configs” will show our build of Android, which lives on the SD card.
Ron Amadeo
-
This is TWRP, the most popular Android recovery mode software.
Ron Amadeo
-
Here we’re flashing the Google apps.
Ron Amadeo
-
Hey! this looks familiar. The initial setup.
Ron Amadeo
-
We also get a lovely Lineage logo.
Ron Amadeo
Once you have your MicroSD card flashed, pop it in the Nintendo Switch, slide in your RCM Jig, boot into RCM mode with the special key combo, plug in a USB cord and push the Hekate bootloader as your payload, and you’ll see an actual user interface. From here, hit “More Configs” and you should see an option to launch your build of Android.
via Ars Technica https://arstechnica.com
August 15, 2019 at 06:46AM